
swa.ml 2.1 editor usage
This guide covers extension 0.17.1. Open a .swaml file with the extension. It bundles the independent language core 3.0.0, which implements the swa.ml 2.1 standard and parser (profile swaml-reference/2.1). Files have no language header. Sources written for swa.ml 2.0 or for earlier case syntax report ordinary errors; the bundled reference RELEASE_2_1.md explains the migration.
Use swa.ml: New Model for a starting file, swa.ml: Browse Official Examples for examples at the bundled language revision and swa.ml: Open Offline Help for these guides inside VS Code. swa.ml: Language Server Status (or the status bar item) shows the extension version, its installation or development location and source revision separately from the language core.
The standard library is bundled. Opening the swa.ml repository also opens its source copy; an exact copy is inspected separately and does not add duplicate packages. A modified or different library is not silently substituted for the pinned one and can report genuine conflicts.
Modeling with swa.ml 2.1
A package is a closed context: its top-level component occurrences, the package connects between their ports, its use cases and tests and the links between them. Definitions may be imported from other packages; occurrences are never connected across packages. Every required port of a top-level occurrence needs exactly one peer through the package connections.
package Lamp {
  port def Switch {
    provides event pressed();
    requires event changed(lit: bool);
  }
  requirement Responsive {
    /** The lamp answers every press. */
  }
  component def User {
    port switch: Switch;
  }
  component def Controller {
    reversed port switch: Switch;
    attribute lit: bool = false;
    operation toggle() {
      lit = not lit;
      publish switch.changed(lit);
    }
    schedule {
      on receive switch.pressed() toggle();
    }
  }
  component lamp: Controller;
  component user: User;
  connect (user.switch, lamp.switch);
  use case 'Turn on' of lamp {
    /** A press turns the lamp on. */
    publish user.switch.pressed();
    on receive user.switch.changed(lit) {
      assert lit;
    } or after 1s {
      fail "no answer";
    }
  }
  test 'Starts off' of lamp {
    assert not lamp.lit;
  }
  associate user to 'Turn on';
  satisfy Responsive by lamp;
  verify Responsive by 'Starts off';
}
- Interface-only components. A component with ports and no operations, schedule entries or parts, such as
User, needs no implementation. Actors (external systems) and test stubs are written this way; only a case script acts through their ports. - Use cases and tests are package members:
use case X of y { … }andtest X of y { … }. The subjectyis a top-level occurrence of the same package. A case withoutofor without statements records intent only. A script acts through the ports of associated occurrences withactor.port.memberendpoints:send,publish, port calls,on receive … or after …,on call actor.port.op(a) { return v; },wait,if, loops,assertandfail. A test may also call operations of its subject and read its attributes (lamp.lit), but never assign them. - Links are package members.
associate Z to X;makes an occurrence an actor of a case.satisfy R by X;names the design (a component definition or an occurrence of this package) responsible for a requirement.verify R by T;names a test that checks it; only tests verify.
Text editing
Use the Problems panel first. Hover explains the pinned rule. Definition and references follow real semantic paths, including nested operations and literal indices. Rename validates the complete proposed workspace before returning versioned edits; a refused rename leaves the source unchanged. Format Document applies the canonical swa.ml layout. Optional parameter and default-result hints follow the swaml.inlayHints.* settings; clicking a default result writes returns void through a validated edit.
Completion knows what each position names: after connect (a. it lists the ports of a, after send, publish and on receive only the fitting port members, in case scripts actor.port.member of associated actors, in tests the subject's operations and attributes, and the fitting elements after of, associate, satisfy … by, verify … by, include, deploy, to and after. Items use the spelling the source needs (quoted, or qualified when not imported) and show their declaration. Type positions list only fitting types; snippets appear only where a statement or member can start. Diagram fields use the same suggestions.
Names may contain spaces, letters outside ASCII or reserved words when quoted. Type Withdraw cash in a diagram and the source receives 'Withdraw cash'; quotes are added only where swa.ml requires them. A name cannot contain ., :, [ or ].
Diagrams
Open the graphical editor with the circular diagram icon or swa.ml: Show Diagram; swa.ml: Which Diagram? suggests a view. Choose GV, IV, CV, SV, GRV, FV or TV for General, Interconnect, Case, Sequence, Grid, Flow and Timing. Source declares views with library names such as Swaml::Views::Interconnect, never the renderer abbreviations. Browser navigates ownership and Up goes to the owner in the same kind of view. If the diagram's root is deleted or renamed in text, the diagram shows its nearest existing owner with a short note and returns to the root when it exists again.
Timing uses the same horizontal canvas controls as the other graphical views: grid, Select/Hand, zoom out, live percentage (click for 100%), zoom in, fit and automatic layout. Select keeps wheel scrolling; Hand pans by dragging and zooms with the wheel. Hold Space over the canvas for a temporary Hand tool. Timing's layout reset rebuilds its source-derived rows and fits them; its rows stay fixed, and it has no connector routing correction button.
Properties and Browser start closed when a diagram view has no saved pane choices. Use their toolbar buttons to open or close them. The diagram's *.swaml.json remembers each pane's visibility, docking and geometry separately for each root and view, including separate General Structure and Tree choices. Returning to a view or reopening it restores those choices. Selecting an element or refreshing source does not open a pane.
If diagram JSON cannot be saved, a warning explains that the choices apply only in the current editor. The panes remain available for inspection; reopening uses the saved JSON.
Select an element to inspect it in an open Properties pane. Shared inherited or indexed occurrences are inspected until you choose Open declaration. Save, Undo and Redo use native workspace history; layouts and pane choices are saved in *.swaml.json sidecars with their source and hold presentation, never semantics. Use the source editor for a full declaration or an unsupported graphical change.
Editable Type, existing operation Returns, and specialization fields in Properties share the creation card's type dropdown. Click the field or its arrow to list compatible existing choices, or type to filter. Opening the list preserves the current type even when it is not among the suggestions; Enter or a click inserts the source spelling without saving, and a later Enter or leaving the field applies it. Escape first closes the list, then cancels the field draft. A local untyped component can receive its Type here; shared occurrences still require Open declaration.
Creating elements
Every view has a toolbar Add menu, and right-clicking the canvas or an element lists the same kinds. Properties + adds a member to the selected element. All of them open the same creation card beside the point you chose, fully visible and clear of Properties, Browser, the minimap and the toolbar.
- The card asks only what the diagram does not establish. A new element goes where the diagram is opened; the card never asks for a root or place. An instance asks for its Type first. Yes/no choices such as Optional, Reversed and Concurrent are checkboxes; bodies and advanced settings wait under More. Hover a label for its explanation.
- Click a reference field or its arrow to list compatible choices from the same completion as text; typing filters the list. Arrow keys move, Enter or Tab inserts the source spelling, and typing
a.lists the ports ofa. A field with exactly one fitting element is preselected. - Typing a name that does not exist yet is fine. The footer says what Apply also creates, such as
port def Flow, or why Apply would be refused, from a dry run of the same validated edit. A missing definition, subject, actor, port, route or handler is created in the same change. - Esc first closes the suggestion list; a draft you have edited needs a second Esc to discard. Apply validates the whole workspace; an error keeps the card and your values. Drafts are transient, so apply or discard before changing views.
- After Apply, the diagram keeps its root and selects the new element. A diagram of the read-only standard library offers nothing to add, and a root with nothing to add says where to add instead.
Hover a port to show its round connection handle and drag it onto another port to connect them; only valid targets light up, and dragging the port body still moves it. Elements show relation handles on hover: drag from one onto a valid target to create the view's relation, for example an occurrence onto a case to associate it.
In Interconnect, drop that connection on a highlighted peer component boundary to create a port there and connect it immediately. It uses the source port's type and the opposite Reversed setting; a reversed source creates an ordinary port. An untyped inline source receives a new MyPortDef containing its existing members and comments, and both ports use it. Existing names receive a numeric suffix. Required behavior is added locally to an active target; shared component definitions stay unchanged. The new port appears at the drop position, and one native Undo restores the source and placement. Escape, the source's own boundary and empty canvas cancel the gesture. This creates inverse peers; parent/child forwarding uses the language's matching-direction rule.
Hover or keyboard-focus a port to inspect its exposed attributes, events and operations in a tooltip. Each row shows the signature and its effective provides or requires direction for that occurrence; a reversed port swaps those directions. Escape dismisses the tooltip. Enter selects a focused port, and Shift+F10 opens its port menu.
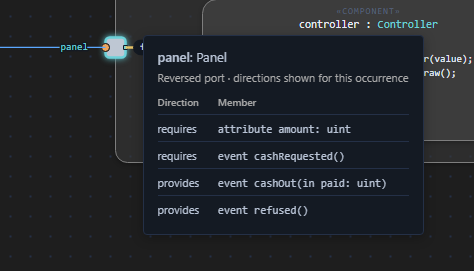
The tooltip reports the direction of this occurrence, including the effect of a reversed port. The diagram retains port pins without duplicating their member list inside every component.
A reversed port also swaps the normal port's fill and outline colors. Its direction mark uses the reversed outline color; selection and connection highlights retain their usual cues. SVG export keeps the same colors.
Editing in place
Double-click a local element name to rename it inside that element; Enter commits and Escape cancels. Double-click a local comment note to edit its Markdown inside the note and press Ctrl+Enter (Command+Enter on macOS) or Apply. Rejected names and text stay editable beside their validation error. Shared inherited or indexed elements require opening their local declaration first; reference sources stay read-only. Text fields and choices opened from a diagram, including simulation settings and import choices, stay inside the diagram; file export uses the native Save dialog.
General, Interconnect and Grid
General shows components, definitions, requirements, package cases and their associate, satisfy and verify links; Structure and Tree change presentation while keeping occurrence identities. Interconnect shows per-member directions, explicit connections and forwarding. Opened on a package it shows the top-level occurrences as name : Type with their parts and the package connections between them with their name and QoS policy, such as feed : Reliable; definitions open in their own Interconnect. Interface-only occurrences, the actors and stubs a case acts through, have a dashed outline and a small figure. Drag between their ports to add a package connect. A package without top-level occurrences says so above the canvas, with Add → component and a link to the Interconnect of each definition.
Show case in the Interconnect toolbar lists the use cases and tests whose messages travel the shown lines, in a package, component or definition view. Choosing one highlights each line its messages use, including forwarding inside components, numbered in the case's order; a reply repeats the number of its call with ↩. The toolbar chip says how many of the case's messages are on these lines, and each line's tooltip lists them. This overlay is authored intent projected from the case script, not run evidence: it is saved with the layout, ignored once the case is gone, and × clears it without touching run results.
Automatic Interconnect and General Structure layout compare fully routed candidates. Dragging and resizing make room locally; Escape restores the gesture's start, and geometryLocked sidecar constraints keep geometry fixed.
Grid uses the same category icons as General View. Select an icon to show that category's tables and appropriate columns. Exactly one category is selected; clicking its icon again keeps it selected. The choice is saved for that view. Requirements show their declared attributes and Satisfies, listing the designs named by satisfy … by. The Cases category contains separate Use cases and Tests tables; Verified in Tests lists the requirements named by verify … by. These links record intent, not passed tests or proof.
Cells show element and file names without their owners. Hover a cell or link for its complete path; filters and CSV use complete paths, and sorting follows the displayed names.
Each table keeps its own column widths/order, filters, sorting and selected rows in the per-view diagram JSON when you switch categories. Older saved visibility choices resolve to the prior active visible category, then the first previously visible category, or the first available category if all were hidden; existing table settings stay intact. Its Export CSV uses that table's displayed columns and filtered or selected visible rows. Toolbar CSV follows the table being inspected and names it beside the action.
Double-click an editable cell, or focus it and press Enter or F2, to edit inside the cell. Names, local Type clauses, Documentation and local authored attribute values are editable; inherited and indexed occurrences stay read-only. Select several compatible rows and edit their common field: Apply validates the whole change as one native edit, rejected drafts retain their error, and Undo restores the batch together. Attribute columns edit each row's exact child declaration. A package's associate, satisfy … by and verify … by links also remain source-backed rows under Other elements and Browser entries; Delete removes the link and Rename stays unavailable.
Case View
Case View draws use cases as named ellipses and tests as ellipses labelled «test», inside a dotted boundary for their subject occurrence labelled subject · component with its name and type. Cases of one subject share one boundary, several subjects stand side by side, and a case without a subject stands below every boundary. Associated occurrences appear once each as actors labelled name: Type on the left, joined to their cases; requirements stand on the right, in several columns when there are many, and verify and satisfy links are dashed arrows with their keywords. A satisfy … by a definition is drawn from each boundary or actor that is an occurrence of it, and a satisfying part of a subject appears inside its boundary. Documentation notes hang below their case. Unrelated components are omitted.
Add a requirement, use case or test from Add or the canvas menu. Opened on an occurrence, the new case takes it as its subject; in a package the card offers an optional subject and actors, and a new name creates the occurrence with an interface-only definition. Right-click a case to associate an actor or add a verify or satisfy link, or drag from an occurrence to a case to associate it, from a test to a requirement to verify it and from a component to a requirement to satisfy it. Drag a case onto another boundary to change its subject, or out of every boundary to remove the subject of an intent-only case; the case stays in its package.
Sequence and Flow
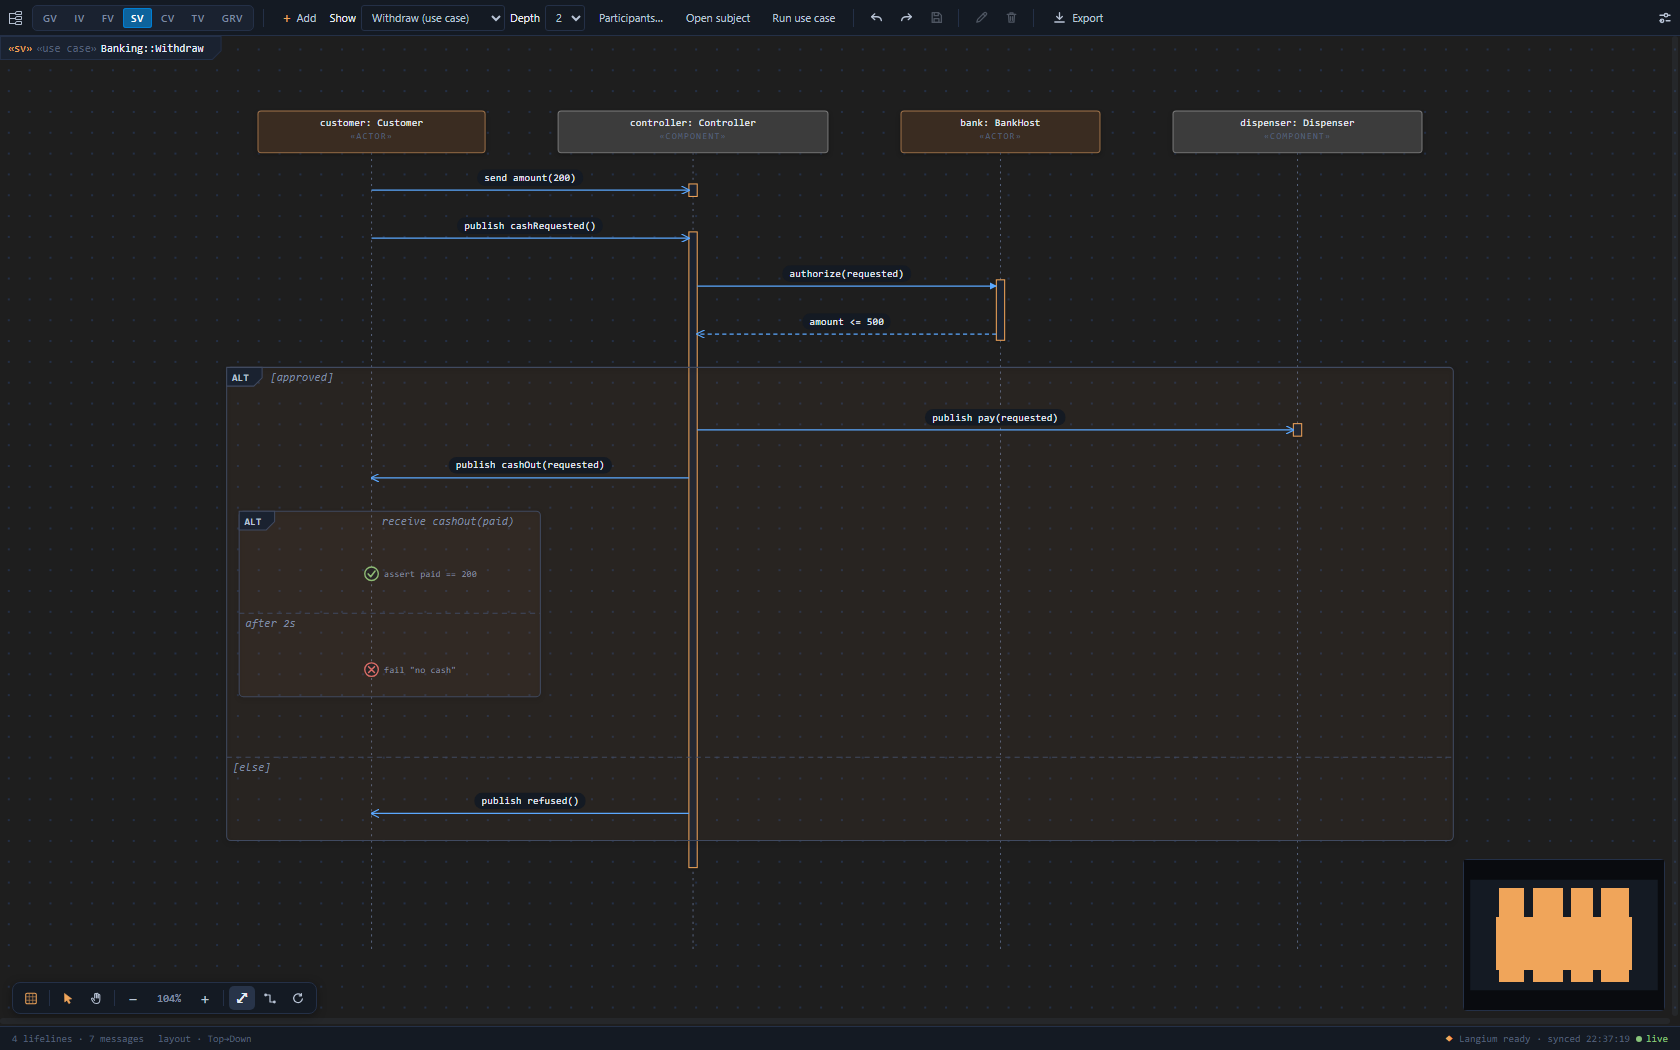
The banking example follows a withdrawal from the customer through the controller, bank and dispenser. Open the complete executable-case model to inspect the same source in your editor.
Sequence and Flow show one projection of the statements of operations, use cases and tests. Open Sequence on an operation, a use case or a test, or on a component or package and choose one in Show. Lifelines are occurrences, the case's actors and, for a test that calls or reads its subject directly, a «test» lifeline; they appear as soon as a case is selected. send and publish are open-headed arrows and port calls are filled arrows with a dashed return. Each message is followed through the package connections to the operations it triggers, drawn as activation bars, up to the chosen Depth; local calls are self calls. if, loops and on … or after are alt, opt and loop frames, assert is a check, fail a cross and wait a time gap. Participants… adds other occurrences of the package.
To add a message, drag from a lifeline or activation bar to another lifeline (or the same one for a self call) at the time it should happen, or choose Add → publish…, send… or call…. The card asks From, To, Kind and Endpoint, an existing port member or a new name. The message becomes a statement of the shown behavior: in an operation a publish, send, port call or local call; in a use case or test a script statement through the actor's port, such as publish user.switch.pressed();, or on receive user.switch.changed(lit) { } when the arrow points at the actor (on call … { return …; } for a call). Missing members, port definitions, ports, connections, the actor's association and handler or emitter stubs are created in the same change. Drag a message up or down to move its statement; right-click it to delete it or edit its arguments, and right-click a frame to edit its condition. Deleting a message also removes the member and empty handler that only it used.
Flow draws operations, use cases and tests as frames with their statement flow, states and schedule activation. A package or component chosen as root is the canvas scope, without an extra enclosing frame. Right-click a statement to add one after it, or a loop, branch or state to add at its end; drop a statement onto another of the same behavior to move it before (upper half) or after (lower half) it. Attribute values, conditions, loop headers and until footers are edited where they are shown. Connect an operation input or local value pin to an argument, assignment value or return value to change that binding: hover or select the source pin and drag its + handle onto the target pin. Bindings stay within one operation and obey its scope and types; literals, formulas and indexed expressions such as values[i] stay source text. Hover try to see its fallback behavior.
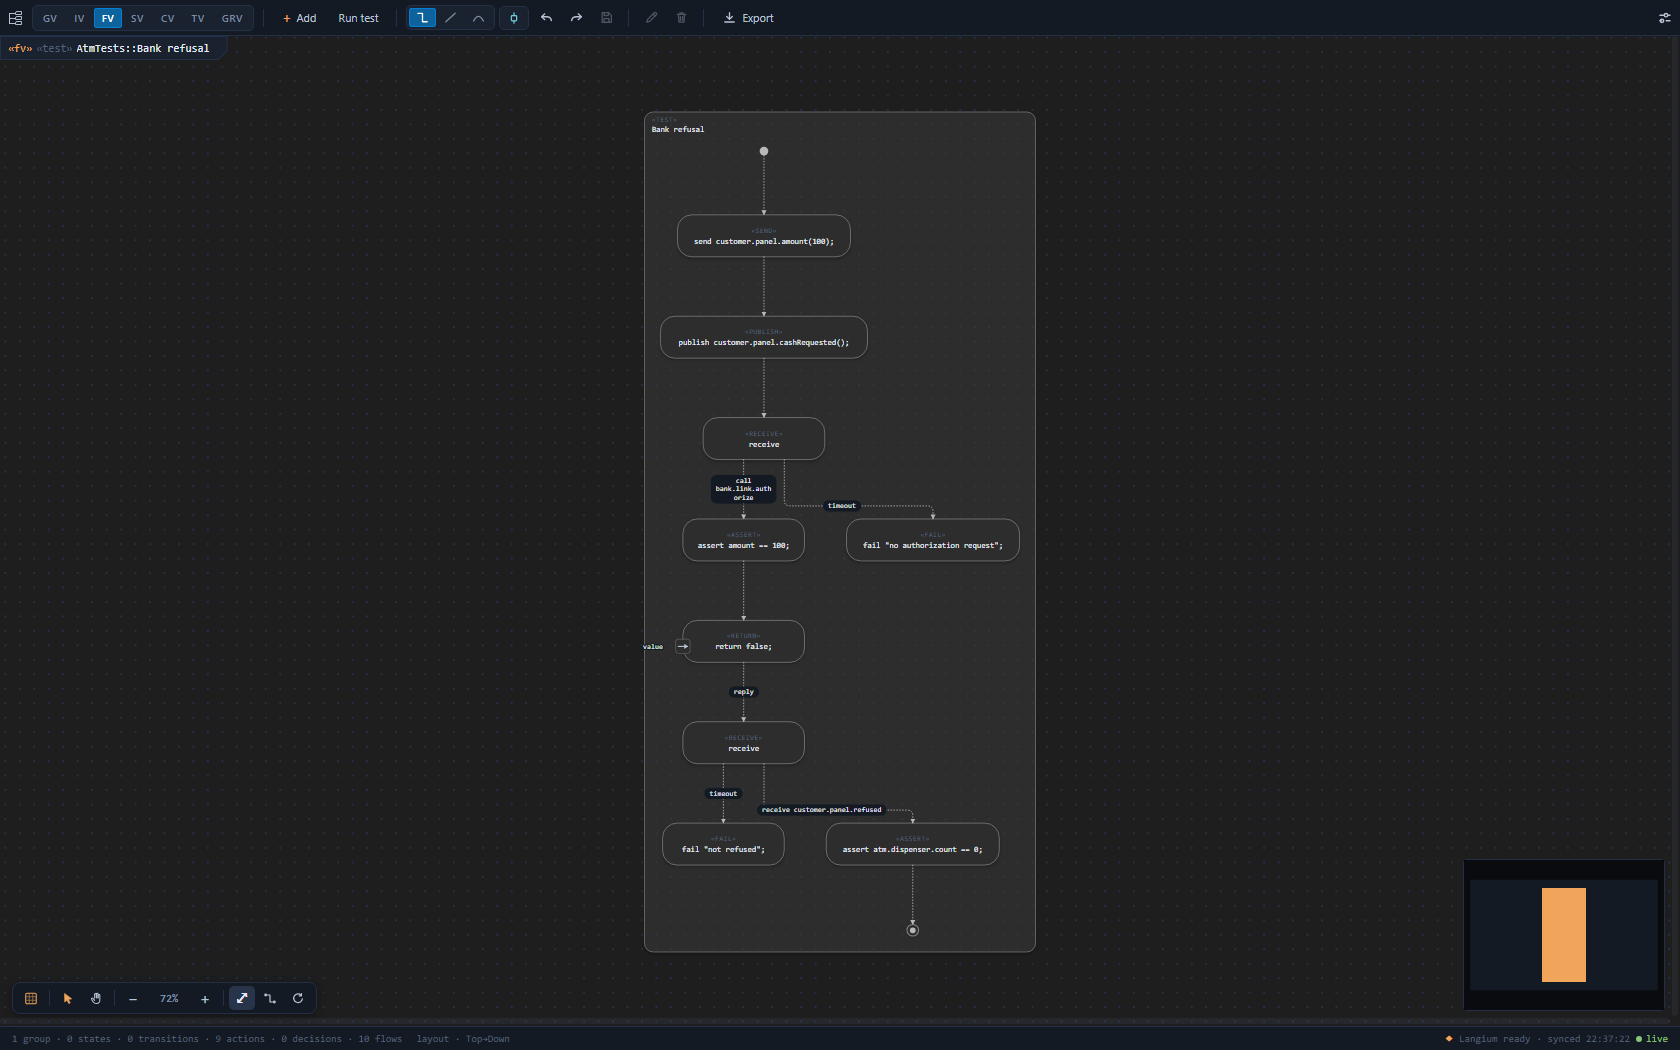
Sequence and Flow are two views of the same case script. The Flow example makes the bank-refusal path and checks visible without changing the source behavior.
Practical editing walkthroughs
Choose the task you want to practise: General: model structure, Interconnect: port wiring, Case: actors and requirements, Sequence: message exchanges, Grid: tabular editing, Flow: statement logic or Timing: contracts and observations.
The exercises use the Lamp model earlier in this guide, the complete banking model, and two short examples below. Download the banking model into a writable workspace and open its source file. Keep the Problems panel visible and resolve errors before applying graphical edits. Existing captures illustrate the views; their element names and layout can differ from the exercise.
Example scope: The PortBoundary and Timing blocks below are complete models. The other blocks are excerpts for the named package or existing case script, not standalone source files.
Open Browser and Properties with their toolbar buttons when needed. Browser selects the ownership context; Properties inspects the selected declaration or occurrence. Selection does not open a closed pane automatically. For a shared, inherited or indexed occurrence, choose Open declaration before changing its shared definition. Adding a member to its real owner changes the model. Moving a card, changing zoom, filtering a category or choosing another view changes presentation.
The toolbar Save, or Ctrl+S / Command+S, saves the model and diagram JSON through VS Code. Source edits and diagram operations use native Undo/Redo. Six canvas views use Export to save SVG through the native Save dialog. Grid uses Export CSV instead. Neither an SVG nor a presentation sidecar replaces the source model.
General View editing walkthrough
Goal: add a requirement, relate it to the design, and organise a readable architecture overview.
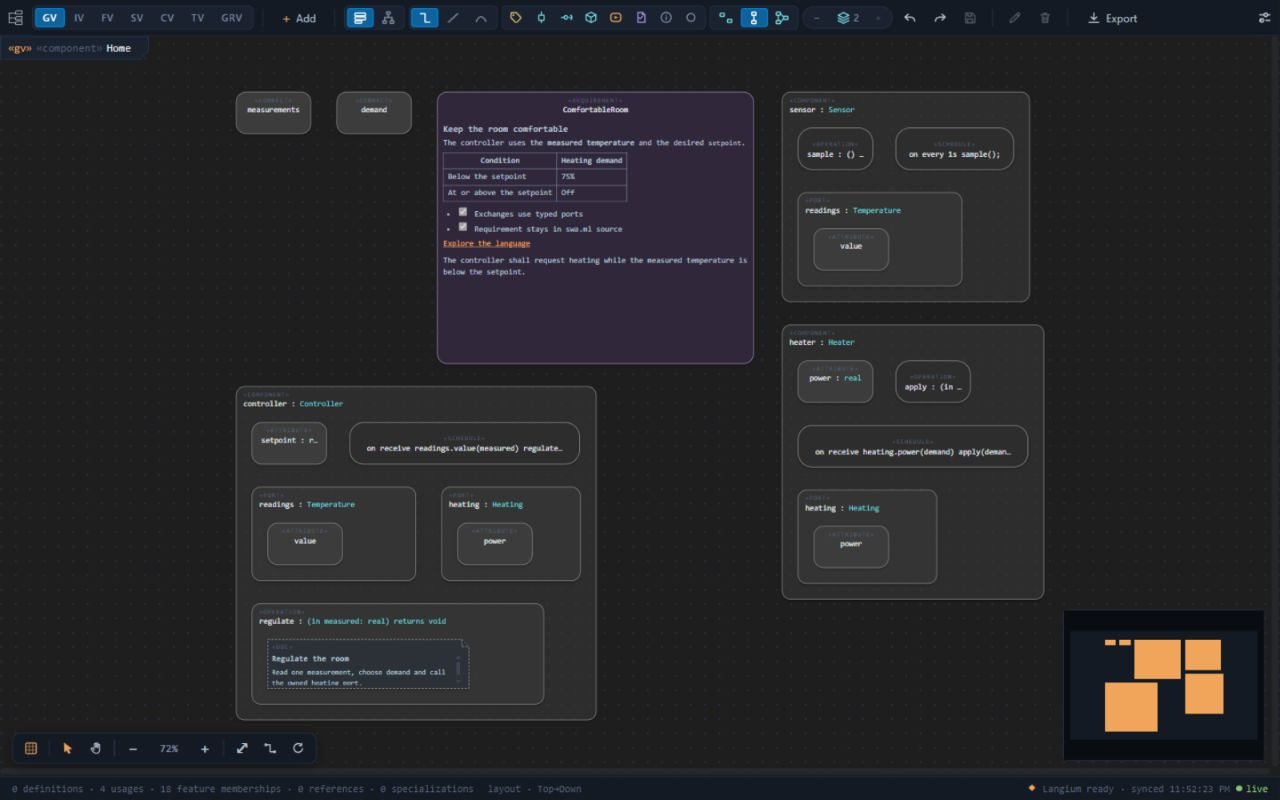
Open the right context. In the banking model, place the caret on the Banking package declaration and run swa.ml: Show Diagram, then choose GV. Alternatively, use Browser to open that package. Start with Structure mode: members appear inside their owning containers. Switch to Tree to see ownership and typing as a hierarchy. The identities remain the same in both presentations.
Make the overview readable. Use the category icons to show the kinds you need and the relation controls to choose none, structural or all relations. The opened-level controls expand or close complete levels. Select the atm occurrence and inspect its ATM type and nested controller and dispenser parts. Properties helps distinguish a reusable definition from one of its occurrences. Hiding a category or closing a container does not delete its contents.
Create a requirement. With Banking still the root, choose Add → requirement and name it Cash available. The card belongs to the open package, so it does not ask for another placement context. Apply, then use Properties to add documentation explaining the intended responsibility. The resulting package member starts like this:
requirement 'Cash available' {
  /** The ATM exposes a customer withdrawal interface. */
}
The editor adds quotes because the name contains a space. Add, the canvas context menu and the appropriate Properties + use the same creation card and whole-workspace validation.
Connect the claim to the design. Show all relations if needed. Hover atm, use its relation handle or context menu to choose satisfy, and select Cash available. Inspect the new line in Properties. The source receives this package member:
satisfy 'Cash available' by atm;For a verify link the source must be a test, while an associate link connects a top-level occurrence with a use case or test. These are distinct relationships, not interchangeable arrow styles.
Edit without losing context. Double-click the local requirement name to rename it. Enter applies; Escape cancels. Double-click its comment note to edit Markdown and use Ctrl+Enter / Command+Enter or Apply. Use a Type or specialization field in Properties where offered, choosing a compatible definition. Opening the suggestions alone does not apply a change. An invalid rename or specialization retains its draft and error instead of partially changing the model.
Remove the exercise deliberately. Select the new satisfy line and Delete it to remove that source-backed link. You can then delete the unreferenced Cash available requirement, or Undo to restore either change. Deleting a card changes the model; use visibility controls to hide it. Dependencies can make a deletion invalid, and validation explains what must be addressed.
Save and share the overview. Arrange cards, choose a useful opened level and use automatic layout or Fit. Save to retain the view in its sidecar, then Export SVG. General View has no case-run button: use Testing or the run commands for executable cases/tests, then inspect their behavioral views.
Expected result: a source-backed requirement and explicit satisfaction claim, with independent Structure and Tree presentation choices. The claim records design responsibility; it does not establish that a test passed or that the requirement is proved.
Interconnect View editing walkthrough
Goal: wire compatible ports and identify the real source connection behind each line.
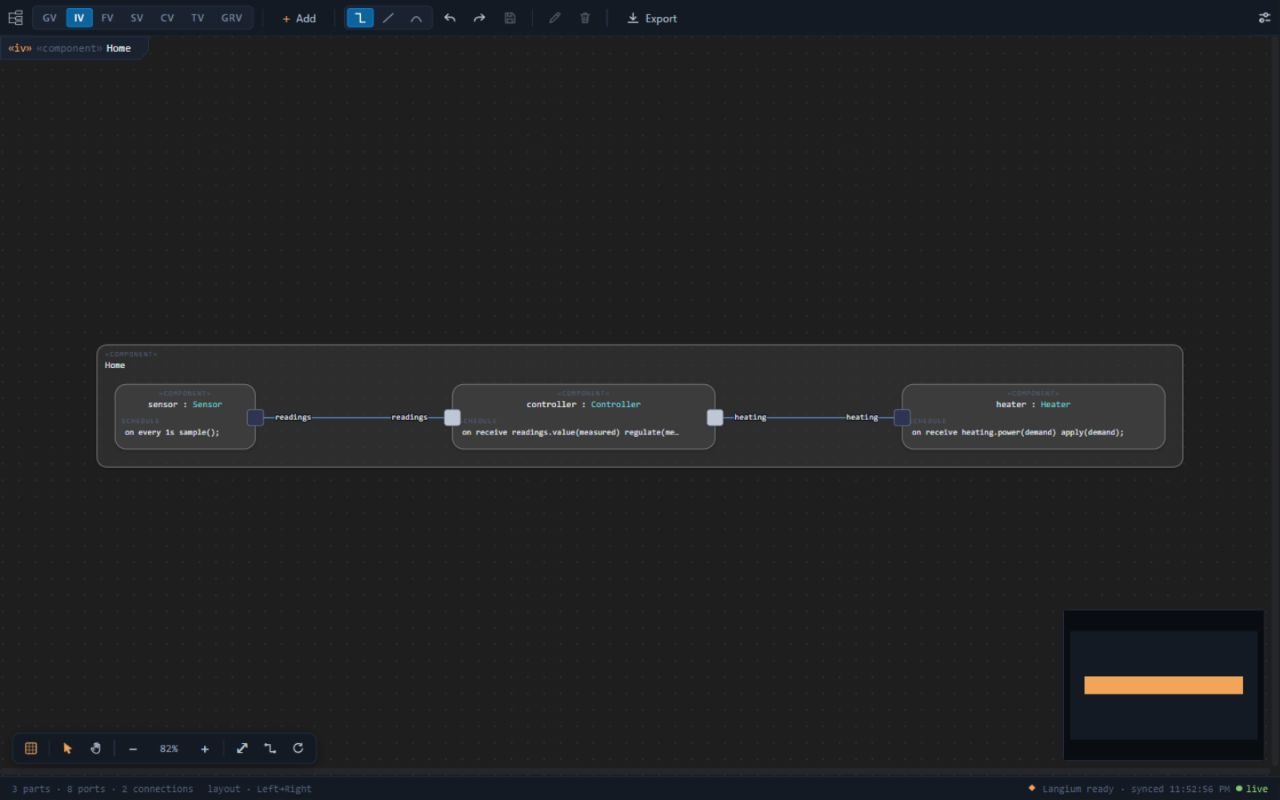
Follow an existing route first. Open IV on Banking to see the customer, atm and bank occurrences and their package connections. Open ATM separately to inspect forwarding from its boundary ports to controller and the connection to dispenser. Use Browser and Up to distinguish a package-level peer connection from an internal parent/child forwarding connection.
Inspect a port before dragging. Hover or keyboard-focus customer.panel. Its tooltip lists effective provides/requires directions and member signatures. Inspect atm.panel to see the reversal. Enter selects a focused port; Shift+F10 opens its menu. Properties and Open declaration lead to the defining port/component when shared members need a change. Dragging the port body moves its presentation; its round connection handle creates wiring.
Practise on a small source. Create a separate writable model file containing this excerpt of the port-boundary test model, then open IV on PortBoundary:
package PortBoundary {
  port def Signal {
    provides event pulse();
    requires attribute status: int;
  }
  component typed {
    optional port link: Signal;
  }
  component typedPeer { }
}
The optional port keeps the starting model valid before it is connected. You can also create components with Add → component and ports with the selected component's + or context menu. Check Optional when an exercise port must be allowed to remain unconnected.
Create the peer and connection together. Hover typed.link, drag its round handle onto the highlighted boundary of typedPeer, and drop. The edit creates a peer port with the same type and opposite reversal, then connects them. The new port uses the drop position. One Undo reverses the complete validated source-and-placement gesture. Empty canvas, the source's own boundary and Escape cancel the gesture.
Connect existing ports and inspect the result. Where both compatible ports exist, drag handle to handle instead. Only valid targets light up. Select the resulting line and inspect endpoints, connection source and any QoS policy in Properties. Ownership and structural contracts are validated; visual proximity is insufficient. Parent/child forwarding uses matching directions rather than the inverse-peer rule.
Edit or delete the correct declaration. Rename local elements in place and edit the offered fields. A source-backed connection exposes its deletion action. A bundled line can represent several members, so inspect and choose the intended connection rather than assuming the visual line is one declaration. Deletion must leave a valid workspace. For the compound peer-creation exercise, Undo returns to the initial valid model without leaving its generated peer unconnected.
Compare authored traffic with a run. Return to Banking and use Show case → Withdraw. Numbered highlights project messages from that script onto the wiring; this is authored intent. Clear the chip with ×. Run Withdraw through Testing or its run command, then return to IV for actual message counts and dimmed unused routes. IV does not provide the Sequence/Flow case-run button.
Save and export. Move or resize components, adjust routing, Fit and Save. Presentation choices belong to the sidecar; port declarations and connections belong to source. Export saves SVG with the port directions and supported current overlays.
Expected result: validated ports and connections with traceable endpoints. IV describes modeled wiring rather than discovering a physical network. Its authored case overlay is distinct from execution evidence.
Case View editing walkthrough
Goal: connect actors, subjects, cases and requirements while keeping verification intent separate from results.
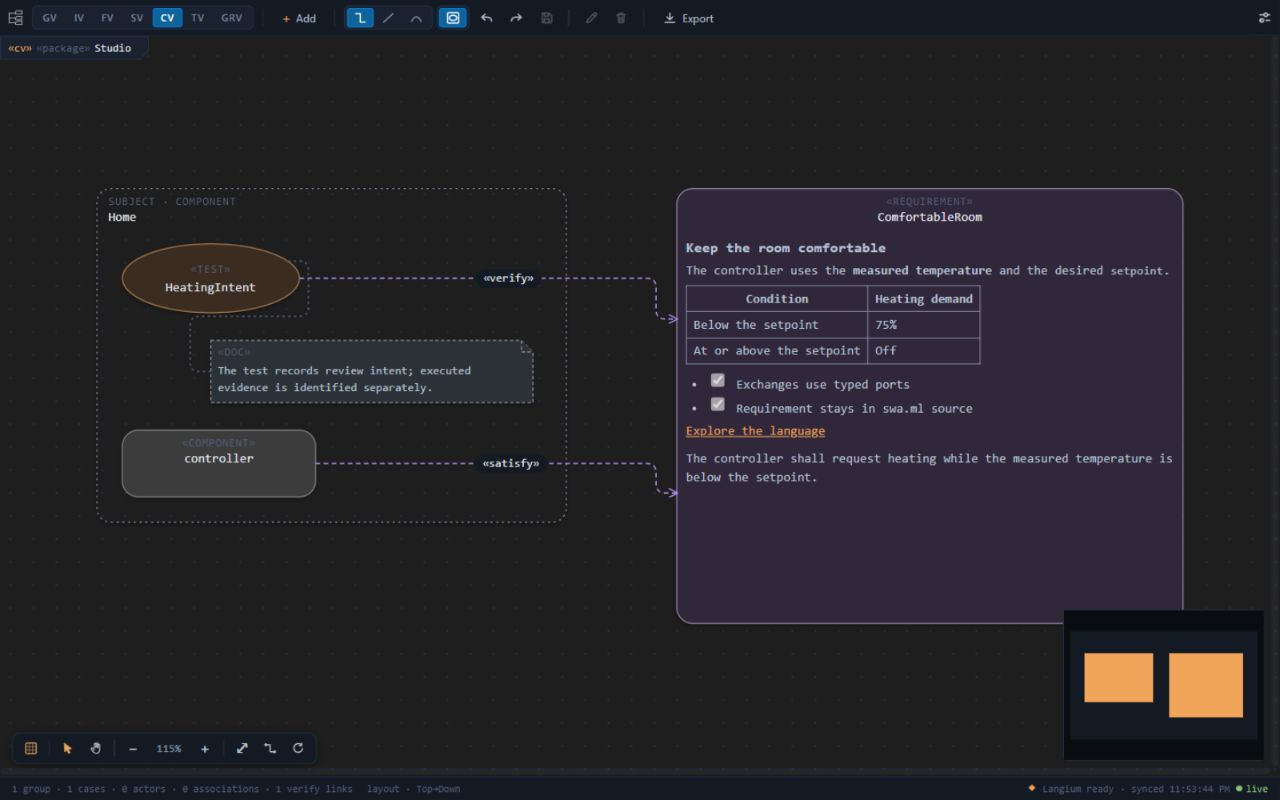
Open a package with cases. In the banking model, open CV on AtmTests. The atm subject forms a dotted boundary; tests appear inside it, associated customer and bank occurrences appear as actors, and Cash limit is linked to its verifying test. Unrelated components are omitted. Browser remains available to navigate them.
Inspect the trace. Select Bank refusal, open Properties, and inspect its subject and documentation. Select the verify link and inspect its requirement and owning source. The model contains this package-level relationship:
verify 'Cash limit' by 'Bank refusal';Only a test can verify a requirement. A use case does not become a verification test simply by drawing a line.
Create an intent-only case. Choose Add → use case, name it Review withdrawal, select atm as Subject, and choose customer as an Actor. Leave its body empty for now and review the preview before Apply. The card adds the required association in the same change. When CV is rooted at a top-level occurrence, a new case takes that occurrence as its subject. A new subject or actor name can create the needed occurrence and interface-only definition; the preview states the extra changes.
Add the right relationships. Drag an actor occurrence's relation handle onto a case to associate it. Drag a test onto a requirement to verify it, or a component onto a requirement to record satisfaction. Case context menus offer the corresponding supported actions. These links remain package members, even though the case is drawn inside a subject boundary.
Change the subject, not the owner. Drag a suitable case ellipse onto another visible subject boundary. The editor changes its subject while leaving the case in the same package. An intent-only case can be dropped outside every boundary to remove its subject. Subjects must be top-level occurrences in that package. Definitions, indexed parts and another package's occurrences are not alternative subjects.
Refine or remove the exercise. Rename a local case by double-clicking its name, and edit documentation through the note or Properties. Select a relationship and Delete to remove its source link. Delete a local case only when its dependencies permit that model change. Use Undo if you meant only to alter presentation. Shared/read-only declarations require their owning source.
Save, run and export at the appropriate surface. Save source and layout, then Export CV as SVG. Run an executable test through Testing, its source code lens or a run command, or open that case in Sequence/Flow for the toolbar run action. The empty Review withdrawal case has no checks and is not a successful execution test.
Expected result: a clear subject, actor association and source-backed traceability. CV reviews intent and coverage. Passed evidence comes from an identified bounded run rather than a verify arrow.
Sequence View editing walkthrough
Goal: edit an executable interaction and inspect the values that followed its authored messages.
Open a particular interaction. Download the banking model, select Banking::Withdraw, run swa.ml: Show Diagram and choose SV. If a package/component is the root, choose Withdraw in Show. Use Open subject to navigate to atm, and Browser to inspect its definition without confusing that structure with the selected case script.
Read before editing. Follow the customer's amount and request through the controller, bank authorization call and dispenser. Calls have filled arrowheads and dashed returns; send/publish exchanges have open arrowheads. Activations and followed handlers depend on Depth. Increase it when more triggered operations are needed. Participants… adds exact existing occurrences as presentation. The subject, actors and used endpoints stay visible; this picker does not create an actor association.
Inspect the statement behind a message. Select an arrow and inspect Properties or its source. The initial exchanges come from:
send customer.panel.amount(200);
publish customer.panel.cashRequested();
A case script acts through an associated actor's port/member. Its statements, package wiring and scheduled handlers determine the route; a drawn arrow does not independently invent behavior.
Add an exchange in a scratch case. From the package choose Add → use case, supply its subject and actors, then show it. Drag from a lifeline or activation bar to a target at the desired time, or use Add → publish…, send… or call…. Fill From, To, Endpoint and Arguments. Existing members are suggested. A new name can create missing members, ports, routes, associations and handler/emitter stubs. Review the footer to understand the complete change.
Check incoming case messages. An arrow pointing toward the actor becomes an on-receive script step; a case-handled call becomes an on-call step with a return. In an operation, the gesture writes the corresponding operation statement. Inspect the resulting source after Apply, especially for a newly created endpoint.
Edit order and content. Drag a message up or down to move its statement. Right-click to edit arguments or choose Delete message. Deleting a dashed reply targets its originating call statement rather than a separate handwritten return arrow. Use an offered Properties or inline field for supported edits, and source/Flow for a larger branch or loop change. Whole-workspace validation preserves rejected drafts for correction.
Run the sample. Return to Withdraw and choose Run use case. The overlay displays values, send times, reached checks and any failure; unreached behavior is dimmed. Open AtmTests::Bank refusal and choose Run test to compare a stubbed refusal. An intent-only case has no checks. Source changes make previous run evidence stale until you rerun.
Save the interaction. Save model and sidecar, then Export SVG. Show, Depth, participant choices and geometry are presentation. Adding messages, editing arguments and moving statements change the script. Clear a run with × for the undecorated authored view.
Expected result: editable source-backed exchanges and decorations from one bounded run. Sequence follows the chosen depth; it does not automatically capture an external system.
Grid View editing walkthrough
Goal: update exact source fields across rows and export a deliberate table scope.
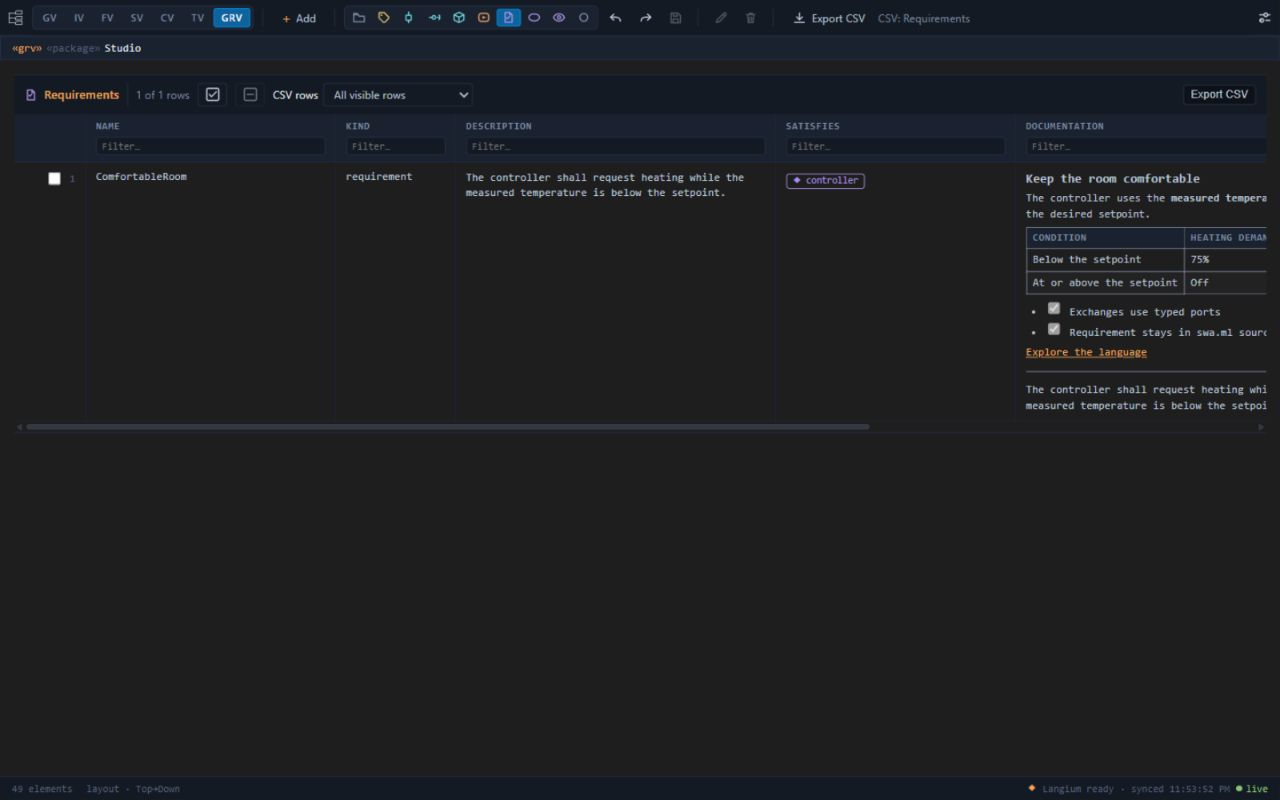
Open the inventory. Open GRV on Banking and choose the Requirements category icon. Exactly one category is active; clicking it again keeps it selected. Cases contains separate Use cases and Tests tables. Categories depend on what exists in the selected scope.
Identify the cell's meaning. Inspect Cash limit, its documentation, its authored limit attribute and its Satisfies links. Cells display short names; hover for complete paths/source locations. Filters and CSV retain complete paths. Open Properties for a selected row or Browser for its owner. Computed links such as Satisfies are not ordinary editable text values.
Edit one declaration. Double-click the authored limit value, or focus its cell and press Enter/F2. Change 500 to another valid unsigned integer, Apply and inspect the source. This edits the requirement attribute only. It does not also rewrite the bank operation's separate comparison with 500. Undo to retain the original sample behavior. Names, local Type clauses, Documentation and authored attribute values are editable where a supported cell target exists.
Create and edit a batch. Use Add → requirement for two local scratch requirements. Select their rows, then edit Documentation or another field editable on every selected visible row. The inline draft names the affected count. Apply validates the complete batch as one native edit; Undo restores it together. Mixed/read-only selections explain an unavailable field rather than silently changing one row. Renames remain individual edits.
Use the proper relationship surface. Create associate/satisfy/verify links through their Add cards, Properties or another graphical view. Grid has no freehand connector gesture between rows. Package links appear under Other elements and Browser; Delete removes the selected source relationship, and Rename stays unavailable. Deleting a local declaration must leave a valid workspace. Shared, inherited and indexed rows remain read-only until their declaration is opened.
Prepare an exact export. Filter the intended column, sort by a header, reorder/resize columns, then choose CSV rows → All visible rows or Selected visible rows. Hidden or filtered-out rows do not enter a selected-visible export. Use that table's Export CSV, or check the table named beside the toolbar action. An empty selected scope disables the relevant export rather than widening its selection.
Save and inspect the CSV. Save each table's filters, sorting, selections and column geometry in the diagram JSON. Check the exported header order, full paths and rows. CSV is an export, not a bulk-import mechanism or replacement for source. Grid has no case-run toolbar button; use Testing or run commands, then inspect the behavioral view.
Expected result: exact edits with a reviewable write set, plus CSV matching the chosen table projection. Satisfies and Verified columns record authored intent, not passed-test status.
Flow View editing walkthrough
Goal: refine statement logic, then run the case that Sequence presents as exchanges.
Open one behavior. Select AtmTests::Bank refusal in the banking model, run swa.ml: Show Diagram and choose FV. Open Banking::Controller::withdraw separately to inspect variables, authorization and branches. A package/component root is canvas scope rather than an extra enclosing behavior frame.
Keep scope explicit. Select a statement and use Properties to inspect its source. Browser moves between the package test and the controller operation. An operation owns its statements; a package test owns its script. Reading a subject attribute from a test does not grant permission to assign that subject's private state.
Add a meaningful check. In Bank refusal, right-click the final assertion and choose Add → assert to insert after it. Enter atm.dispenser.dispensedToday == 0. This complements the existing count check:
assert atm.dispenser.count == 0;
assert atm.dispenser.dispensedToday == 0;
Right-clicking a loop, branch or state adds at that construct's end instead. Apply uses the same validated statement-edit path as Sequence.
Refine expressions and order. Edit a displayed condition, attribute/value, loop header or until footer where its field is offered. Practise a time step by adding wait with 1ms at an intentional point. Drop an eligible statement on another in the same behavior: upper half means before, lower half after. Moving a check across a receive or branch changes semantics even if the diagram still looks tidy.
Connect values, not arbitrary control arrows. In an operation, hover/select an input or local value pin and drag its + handle onto an argument, assignment-value or return-value pin. This replaces that expression with the selected value, subject to type and lexical-scope validation. Bindings stay within one operation. Literals, formulas and indexed expressions remain source text. Computed statement-flow arrows cannot be freely rewired or deleted. Supported authored state transitions and schedule-completion dependencies have their own relation tools.
Delete the intended source statement. Select an added assertion/wait and use its supported Delete action to remove it. To remove an if or loop, edit/delete the source-backed construct rather than its computed control-flow edge. Shared and inherited internals require their owning declaration. Native Undo restores an accidental model change.
Run and diagnose. Choose Run test with Bank refusal shown. Reached statements display counts, values and first times; assertions display outcomes, while untaken branches are dimmed. For a controlled failure exercise, temporarily change the added check to atm.dispenser.dispensedToday == 1, run, inspect its failure, then Undo and rerun. Clear evidence with × to inspect pure authored flow.
Save and compare views. Save source/presentation, then Export SVG. Open the same test in Sequence and confirm it represents the same script. Moving a frame, choosing disclosure or zooming changes layout. Inserting, moving or changing statements changes execution and makes old evidence stale.
Expected result: executable checks and branch logic backed by the same source as Sequence. Flow projects supported statements; it is not a freehand activity notation.
Timing View editing walkthrough
Goal: change a timing declaration, run a finite reference simulation and separate contract from observation.
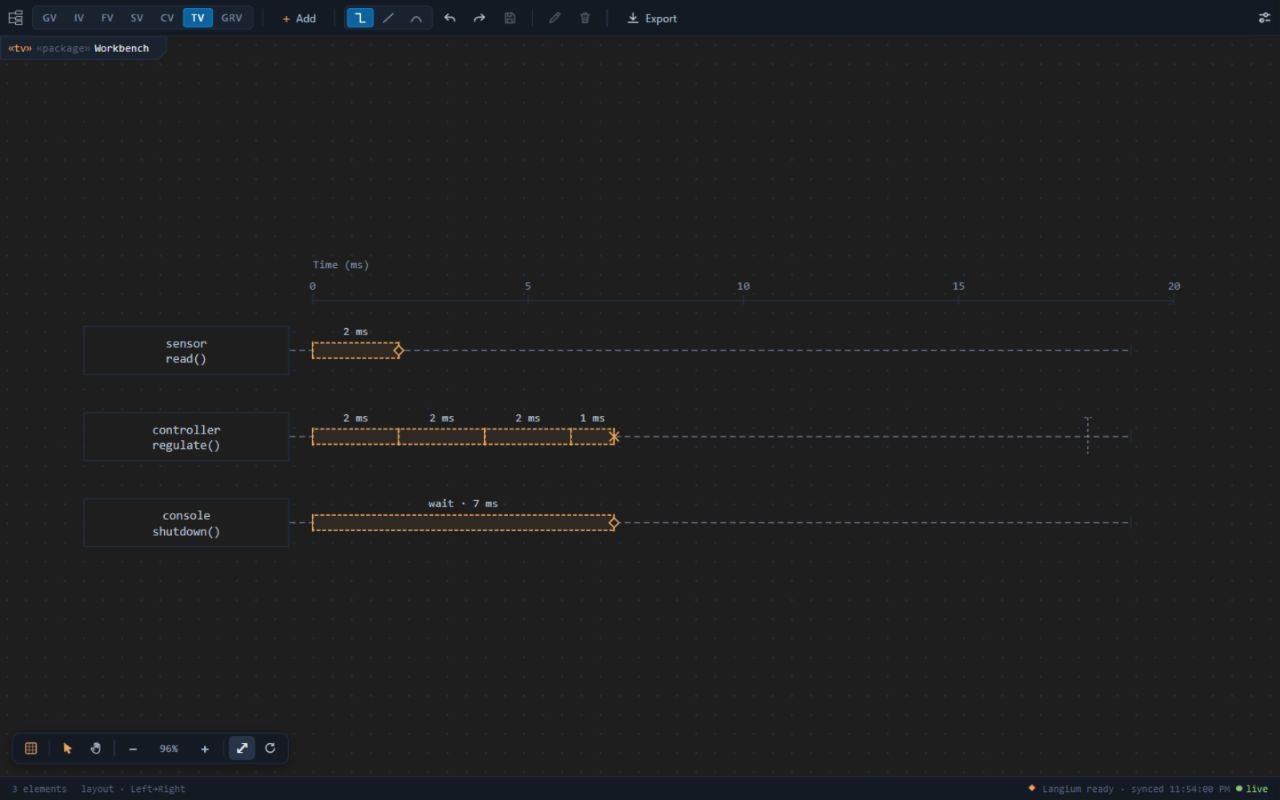
Start with a finite example. Copy this bundled example into a writable source file:
package Timing {
  import Swaml::Views;
  component Demo {
    attribute count: int = 0;
    operation sample() {
      wait 1ms;
      count = count + 1;
    }
    schedule {
      on every 5ms sample() deadline 3ms;
    }
  }
  view observed: Timing of Demo.sample;
}
Open TV on Timing::Demo or its operation. Before matching run evidence exists, read the declared timing contracts. A contract-only drawing is not measured execution.
Inspect the row's source. Open Browser/Properties and select the operation row. Double-click a row to reveal its source. A row projects a particular executable; it is not a separate task whose start time can be dragged. Identical short operation names in different occurrences do not make their evidence interchangeable.
Create timing-relevant elements. At package scope, Add → component creates a component. Open its local context to add an operation and schedule through Add or Properties +. The schedule card supports Trigger choices including start, every, receive, call and after. For a periodic activation choose every, set Period and Operation, then expand More for Deadline and Concurrent where appropriate. A missing operation can be created in the same validated edit; inspect the preview.
Change the contract at its owner. Edit the example's schedule period from 5ms to 8ms, or its deadline from 3ms to 4ms. Use an offered source-backed Properties field where available; otherwise use the source editor. Editing wait 1ms in source/Flow changes the behavior's logical wait. Moving a row or stretching a bar does not edit those values. Timing has no relation handles or connector-routing correction action.
Run the reference model explicitly. Choose swa.ml: Run Reference Simulation. In its diagram form set Run target to Timing::Demo, set Finite horizon to 25ms, then Run. The command opens Timing with source-matched observations and produces the run report. A package target includes its top-level occurrences and connections; a single component target runs with external ports open. This command is separate from a use-case/test run.
Compare intent and observation. Inspect activation intervals, waits and event markers. Compare them with the periodic trigger/deadline without treating a bounded reference run as a deployed scheduling guarantee. A single case run can also supply Timing evidence: run one banking case/test and open TV for its package. Evidence identifies its target and source fingerprints. Editing the model makes old evidence stale rather than silently relabelling it.
Delete behavior through source. To remove a scheduled activation, edit its schedule declaration instead of deleting a bar. Ordinary deletion of a local operation, when offered through Browser/Properties or its source, must also satisfy dependencies such as schedule references. Hiding/removing an observed interval is not a semantic editing operation. Undo restores your source changes.
Save and export. Select/Hand, temporary Space-hand, zoom, Fit and grid controls navigate the horizontal canvas. Automatic-layout reset rebuilds and fits source-derived rows; their positions remain fixed. Save model and sidecar, then Export SVG. A contract-only SVG remains a contract illustration. Share the identified run report alongside an export of observed evidence.
Expected result: an edited source contract and, after an explicit run, matching finite observations. Timing edits operations/schedules through their real owners. It does not provide manual bar scheduling, arbitrary connectors or proof of worst-case execution on a deployed platform.
Running use cases and tests
A use case or test with statements can run. The Testing view lists each package with its use cases and tests and runs one case, a package or all of them. swa.ml: Run Test, Run Use Case, Run Use Case or Test (swaml.runCase) and Run Tests in Package run the case or package at the cursor or ask which one; a Run Test/Run Use Case code lens sits above each case, and the Sequence and Flow toolbar has a Run test/Run use case button for the shown case. Results appear in the Testing view and the status bar summarizes the last run.
Each case runs once in a fresh deterministic run of its package through the bundled core. The script starts after every on start entry; the run stops when the script completes or fails, or at the logical horizon (10 s) or step limit. pass means the script completed with no failed assert or fail and no failure in the run; fail points at the failing statement with its message; inconclusive means the run ended first (horizon, limit, or a script waiting for something that cannot happen); a case without statements has no checks and is shown as skipped. Runs can be cancelled and stop starting further cases after a time budget. The workspace must be free of errors. A result is evidence of one bounded run, not a proof of the requirements its test verifies.
After a run, the diagrams of that case show what happened. The toolbar reads Run: Package::Case , result.
- Sequence: arrows carry their values and send time (
100 @ 0 ns), asserts show ✓ or ✗, the failing step is red, and what the run did not reach is dimmed. - Flow: reached statements show their count, values and first time, asserts ✓ or ✗; untaken branches are dimmed and taken states and transitions marked.
- Interconnect: connections used by the run show how many messages crossed them; unused ones are dimmed.
- Timing: the activations of the last single case run.
Sequence and Flow show the run of the case they display, otherwise the latest run that reached what they show; Interconnect and Timing show the latest run of their package. × clears that case's run and leaves its diagrams undecorated; swa.ml: Clear Run Results (swaml.clearRunResults) clears all of them. Results are kept with the workspace. When the model changes, the toolbar reads Stale run and nothing is drawn until you run again.
swa.ml: Inspect Test reports a test's subject, associated occurrences, statements with their identities, the requirements linked by verify … by and its last result (not run, or stale after a change); inspection does not run the test. Use Package::Test when short names are ambiguous. The requirement trace (agent tool #swamlTrace) names the design of each satisfy … by and the test of each verify … by with its last result.
swa.ml: Run Reference Simulation runs a bounded simulation of a run target, a package (all its top-level occurrences and package connections) or one Package::component alone with its ports open, and opens Timing. The result records its profile, run identity, source fingerprints and core revision; a changed source cannot reuse the trace. Declared timing contracts remain separate from observations.
Recovery
Recoverable syntax errors can leave a clearly marked partial diagram of independently validated declarations. Ambiguous source shows a labelled snapshot of the last validated version or says that a diagram is unavailable. Correcting the source restores the diagram automatically. Graphical edits and runs still require valid complete source, and Flow and Timing never show partial execution or stale observations.
Markdown and media
Requirements and documentation comments support Markdown: headings, emphasis, fenced code, tables, task lists, links and media, rendered in diagrams, Properties and Grid. Requirement description/text attributes remain authored source. Use image notation for pictures and video:


Relative paths start at the documenting .swaml file and must stay within an allowed workspace folder. Local pictures support PNG, JPEG, GIF, WebP, AVIF and SVG; .mp4, .m4v, .webm, .ogv and .mov show a player that starts when you choose Play, subject to the host's codecs. Remote media requires HTTPS. Missing media shows its alternative text; raw HTML and iframes stay inert.
Settings
swa.ml settings are independent of the SysML extension: use swaml.* settings, .vscode/swaml/project.json for project overrides and .vscode/swaml/diagrams/ for layouts. Folder settings apply to the selected model in a multi-root workspace. The legacy swaml.preview.diagrams.showSubjectAsBoundaryBox setting is retained for compatibility; Case View always draws the subject boundary.
Agents and the command line
The AI tools guide lists the nine tools, their inputs and defaults: eight read the model, and #swamlRunTests runs use cases and tests. Agents should inspect source, resolve existing names and validate a complete draft before applying reviewed edits. Portable authoring and validation skills are under resources/reference/skills. The CLI guide documents validation, export and CI exit codes. Both guides are shipped under resources/ for offline use.